Why does your kitchen sink suddenly start leaking or draining slowly right after a minor plumbing change? Many homeowners face this issue when trying to handle sink installations or repairs on their own.
At first, the process may seem technical and even a bit intimidating, especially when you see multiple pipes, fittings, and connectors involved. But don’t worry we’re here to simplify everything for you.
In this guide, we will walk you through how to connect kitchen sink drain pipe step by step, using clear instructions and practical tips.
Together, we’ll understand the components, choose the right tools, and complete the installation confidently.
Key Points You Should Know Before Connecting a Kitchen Sink Drain
- Proper pipe alignment is essential to ensure water flows smoothly through the system, preventing backups or slow drainage.
- Choosing the right material, such as PVC or metal, affects the durability and longevity of your plumbing system.
- Understanding how the P-trap works helps prevent unpleasant odors from entering your kitchen.
- Using correct sealing techniques ensures joints remain leak-free.
- Having basic tools on hand improves efficiency during installation or repairs.
- Maintaining clean and organized working conditions reduces mistakes and supports proper hygiene while handling plumbing tasks.
Preparation is essential before any plumbing task. When we understand the system and gather tools beforehand, the process becomes smoother and faster.
You’ll avoid common issues like misaligned pipes or loose connections. Taking a few minutes to prepare properly ensures better results and gives you confidence as we move forward step by step.
Essential Tools and Materials for Connecting a Kitchen Sink Drain
- Pipe wrench – Essential for tightening or loosening pipe connections securely, ensuring joints don’t leak over time.
- PVC pipes and fittings – Form the main structure of the drainage system, allowing water to flow efficiently from the sink to the drain.
- Plumber’s tape – Used on threaded joints to create a watertight seal and prevent leaks in connections.
- Slip nuts and washers – Provide flexible, tight connections between pipes, making assembly easier and preventing drips.
- Bucket – Handy for catching residual water during installation, avoiding messes.
- Hacksaw or pipe cutter – Helps adjust pipe lengths precisely to fit your sink setup.
- Cleaning cloth – Used to wipe joints, remove debris, and maintain a clean working area during installation.
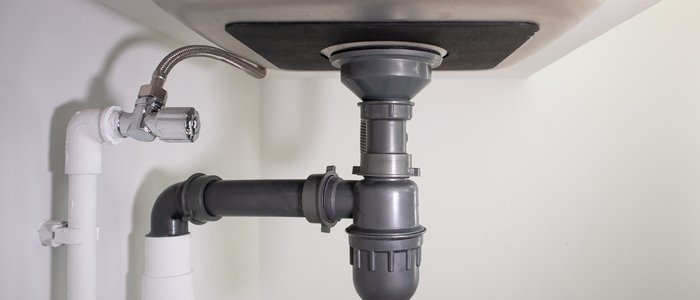
Understanding Kitchen Sink Drain Pipe Components
Before we dive into how to connect kitchen sink drain pipe, it’s important to understand the main components.
The tailpiece connects directly to the sink drain and channels water downward. The P-trap is a curved section that holds water, preventing sewer gases from entering your kitchen.
The trap arm extends from the P-trap to the wall drain. Connectors, slip nuts, and washers hold everything together securely.
Each component plays a specific role in ensuring proper drainage and preventing leaks. When we understand how these parts work together, the installation process becomes much easier and more logical.
Guide How to Connect Kitchen Sink Drain Pipe
Now let’s go through how to connect kitchen sink drain pipe with a clear and simple process.
We follow a logical sequence: assembling parts, aligning pipes, tightening connections, and testing the system. First, we connect the main components loosely to check alignment.
Then we adjust positions to ensure a proper fit. After that, we tighten all connections carefully without overdoing it. Finally, we test the system by running water and checking for leaks.
Each step matters because even a small mistake can cause issues later. When we follow this structured approach, we ensure a reliable and leak-free installation.
Attach the Tailpiece: We connect the tailpiece directly under the sink drain and secure it with a washer and nut.
Install the P-Trap: We attach the P-trap to the tailpiece and align it with the wall pipe before tightening.
Drain Pipe Installation Mistakes You Should Avoid
- Over-tightening can crack fittings and cause leaks: Applying too much force when tightening connections can damage pipes and fittings, leading to water leaks that may worsen over time.
- Incorrect pipe slope leads to slow drainage: Pipes that are not properly angled prevent water from flowing smoothly, causing standing water or backups in the system.
- Skipping washers results in dripping joints: Washers provide a crucial seal; omitting them often creates loose joints that allow water to seep out.
- Using mismatched pipe sizes causes alignment issues: Pipes of different diameters or incompatible fittings make connections unstable and can stress the system.
- Ignoring leaks during testing creates bigger problems: Small leaks left unchecked can grow into significant water damage affecting walls and cabinets.
- Poor alignment stresses joints and reduces lifespan: Misaligned pipes place extra pressure on fittings, increasing the likelihood of failure over time.
- Not cleaning debris affects proper sealing: Dirt or leftover debris in connections prevents seals from fitting tightly, resulting in potential leaks and maintenance headaches.
Quick Tips for Leak-Free Drain Pipe Installation
For best results, we always focus on precision and care. Small details like clean joints and proper alignment make a big difference. When we work patiently and avoid rushing, we reduce the risk of leaks and ensure a long-lasting and efficient kitchen sink drainage system.
- Use plumber’s tape – Always wrap threaded connections with plumber’s tape to create a tight, leak-free seal.
- Check alignment twice – Before tightening, double-check pipe positioning to ensure proper flow and prevent stress on joints.
- Tighten by hand first – Start hand-tightening connections to avoid over-tightening, which can crack fittings.
- Test with running water – Run water through the pipes to detect leaks early.
- Keep spare washers – Have extra washers on hand in case replacements are needed for a secure seal.
- Clean joints before fitting – Wipe and clean all joints to remove debris and ensure proper sealing.
Simple Steps to Test Your Kitchen Sink Drain Connection
- Run water slowly through the sink to observe the flow and detect any irregularities.
- Check carefully for leaks around all visible pipes and connections.
- Inspect joints to ensure they are properly sealed and secure.
- Tighten any loose connections by hand or with appropriate tools if needed.
- Test the full flow of water to confirm proper drainage.
- Observe the drainage speed to spot any slow areas.
- Recheck all areas after a few minutes to catch delayed leaks.
- Clean up any excess water to prevent damage or staining.
Testing is a crucial step after installation. When we run water and carefully inspect each joint, we can quickly identify any issues.
This allows us to fix small problems before they become major leaks. A proper test ensures that your drainage system is working efficiently and safely.
Kitchen Sink Drain Pipe Parts Overview
| Part Name | Function | Installation Tip |
| Tailpiece | Connects sink to drain system | Ensure a tight seal using the washer, and make sure it is aligned straight to avoid leaks or stress on joints. |
| P-Trap | Prevents sewer gas entry | Align properly before tightening, check that the curve holds water correctly, and ensure it fits snugly with the tailpiece. |
| Trap Arm | Connects trap to wall drain | Maintain a slight downward slope for proper drainage and prevent water from pooling inside the pipe. |
| Slip Nut | Secures pipe connections | Hand-tighten first, then adjust gently to avoid cracking fittings or overtightening. |
| Washer | Creates leak-proof seal | Place washers correctly between joints to prevent drips, and ensure they are seated evenly. |
| PVC Pipe | Main drainage pathway | Cut to correct length, smooth edges after cutting, and verify alignment with other components before connecting. |
| Connector | Joins pipe sections | Match pipe sizes carefully, ensure the connection is flush, and tighten without over-stressing the fittings. |
Professional Help for Plumbing Issues
While many homeowners can handle how to connect kitchen sink drain pipe, some situations require professional help. Severe leaks, damaged pipes, or complex plumbing layouts can be difficult to manage alone.
If you notice persistent issues despite correct installation, it may be time to call an expert. We should also consider the cost versus effort when the repair becomes too complicated.
Hiring a plumber ensures the problem is fixed correctly and safely, saving time and preventing further damage to your home.
Maintenance Tips for Long-Lasting Drain Pipes
- Avoid pouring grease down the sink: Grease can solidify inside pipes over time, leading to clogs and slow drainage. Always dispose of cooking oils and fats in a separate container.
- Clean pipes regularly using safe methods: Routine cleaning with non-corrosive solutions prevents buildup of debris and mineral deposits, keeping water flow smooth and preventing blockages.
- Use strainers to catch food particles: Installing strainers in your sink drains helps trap food scraps and prevents them from entering the plumbing system, reducing the risk of clogs.
- Check for leaks occasionally: Inspect pipes and joints periodically for small leaks or drips before they turn into major issues.
- Flush with hot water for smooth flow: Running hot water through your drains helps dissolve minor grease and soap buildup, maintaining proper drainage.
- Avoid harsh chemicals that damage pipes: Strong chemical cleaners can corrode pipes and weaken joints; use mild, safe alternatives for routine maintenance.
FAQ
What parts are needed for a kitchen sink drain pipe?
A typical kitchen sink drain assembly includes a basket strainer, tailpiece, P-trap, trap arm, and the necessary slip nuts and washers that connect to the wall outlet. These parts are commonly made from 1.5-inch PVC, ABS, or brass, and they must be properly sealed to avoid leaks and block sewer gases from entering the space.
How to connect kitchen sink drain p-trap to wall?
To connect a kitchen sink P-trap to the wall, you assemble the trap arm, slip nuts, and beveled washers to join the U-shaped section to the wall outlet. The trap arm may need to be trimmed to length using a hacksaw so it fits properly. Tighten all fittings by hand to avoid leaks, and make sure each conical washer is oriented in the correct direction.
How to connect garbage disposal to kitchen sink drain pipe?
Installing a garbage disposal requires securing it to the sink, connecting a 90-degree discharge elbow, and linking it to the P-trap.
Important steps include applying plumber’s putty to seal the flange, positioning the outlet to match the drain line, and firmly tightening all fittings to prevent leaks.
Can you use flexible pipe for a kitchen sink drain?
Although flexible “accordion” pipes can be used for a kitchen sink drain, most plumbers advise against it. Their ridged interior tends to collect grease, food particles, and other debris, which leads to clogs and bad smells over time. In contrast, smooth, rigid PVC piping is a more reliable and code-approved option for durability and proper drainage.
What size of drain pipe for kitchen sink?
The typical size for a kitchen sink drain pipe is 1½ inches (38 mm) in diameter, which is standard for both single and double sink configurations.
In certain contemporary or high-usage kitchens, a larger 2-inch (50 mm) pipe might be installed to allow quicker drainage and reduce the risk of blockages.
Conclusion
Now you know exactly how to connect kitchen sink drain pipe with confidence and clarity. We’ve covered everything from preparation and tools to step-by-step installation and testing.
By following this guide, you can avoid common mistakes and ensure a secure, leak-free connection. You’ve taken an important step toward improving your DIY skills and becoming more self-reliant at home.
Completing this task not only saves money but also gives you a sense of accomplishment. Remember, proper installation and regular maintenance are key to a long-lasting plumbing system.
Keep practicing and applying what you’ve learned today. With patience and attention to detail, you can handle many home improvement tasks successfully. Stay confident, keep learning, and enjoy the satisfaction of maintaining your own home like a professional.